Controlling your Holiday Lights with Raspberry Pi, Alexa and Go
In this post, we are going to take a look at how we can control the lights on your tree using the Amazon Alexa and a Raspberry Pi.
Why?
Two reasons, firstly because we can, and secondly there is an unusual architectural pattern which needs to be addressed when attempting to bridge the gap between your home and the internet. How does the IOT device running in a NAT’etd environment receive messages from the outside world.
Disclaimer: The code is not necessarily production worthy, it might work through Xmas, there are more clicking on interfaces than I would generally like.
Requirements
To create this system, you will need the following components:
- 1 Raspberry Pi (Any model with network will do)
- 1 433MHz TX/RX module for the Pi - Aukru 433 MHz RF Wireless Transmitter + Receiver Module: Amazon.co.uk: Electronics
- 1 Amazon Echo
- Cheap 433MHz radio controlled power sockets- Remote Control Socket Wireless Heavy Duty 13A Adaptor: Amazon.co.uk: Electronics
- AWS account
- Internet
- Some programming knowledge
Architecture
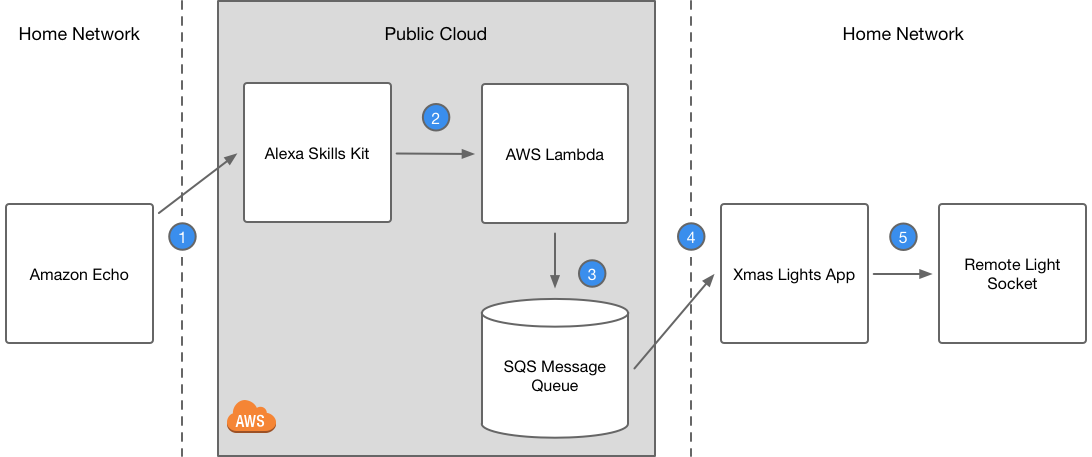
- When you issue a command to Alexa “Hey Alexa, ask Christmas tree lights to turn on,”
- The language processing in AWS will transform this command into a call to a Lambda function.
- The Lambda function adds a message to a Simple Queue Service message queue
- The app running on the Pi is reads this message queue
- It then transmits a code corresponding to on/off over 433MHz radio which is then picked up by your radio controlled power plug
Using SQS allows us to bypass the fact the Pi needs to be exposed to the internet. The Pi makes an outbound connection to the SQS and sits waiting for messages.
Configuring the Raspberry Pi
The first thing to get started is to configure the Pi and the 433Mhz transmitter. Before we can switch our lights on and off, we need to determine what codes are used by your power sockets. To do this, we are going to attach the receiver portion of the 433MHz radio to the Pi we can then sniff for codes by pressing the buttons on your remote.
The way that the power sockets work is that a binary code is transmitted over the radio. The protocol uses a sequence of radio waves to signify the 1s and 0s in the code. The protocol defines what duration between the highs and the lows and that corresponds to a 1 or a 0 in the code.
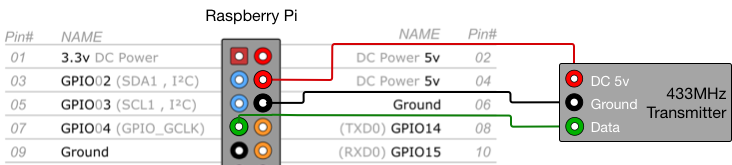
Grab your Raspberry Pi and attach the Transmitter to the GPIO pins, you will need to connect the VCC pin on the transmitter to the 5v power pin on the Pi, I am using pin 2 and the GND to the ground pin on the Pi, I am using pin 3. Lastly you connect the DATA pin to one of the GPIO pins, I am using pin 4.
You then need to run the application on your Pi and set it to scan mode; you can find a compiled version of the application in the GitHub repository:
Releases · nicholasjackson/rcswitch · GitHub.
You will need to choose the appropriate version for your PI Arm6 is used for Pi Zeros and first-generation Pi’s and the Arm7 version is suitable for the Pi model 3.
Deep in the code
The code is written in Golang and uses the Periph.io library to interface to the GPIO pins. The first thing we need to do is to initialize the Periph.io library using the Init function.
examples/main.go
    _, err := host.Init()
    if err != nil {
        log.Fatal(err)
    }
We can then get a reference to our pin and start scanning for codes:
    // Lookup a pin by its number:
    p := gpioreg.ByName(*pin)
    setPin(*scan, p)
    log.Printf("%s: %s\n", p, p.Function())

    sw := rcswitch.New(p)

    // scan for codes
    if *scan {
        log.Println("Starting code detection, press a button on your remote control")

        sw.Scan()
        return
    }
We set the pin mode based on whether we want to send or receive codes for receiving we set the pin to input mode with edge detection for transmitting we set the pin to output mode.
// sets the pin to either input or output depending on if we are scanning

func setPin(scan bool, p gpio.PinIO) {
    if scan {
        // Set it as input, with an internal pull down resistor:
        if err := p.In(gpio.PullDown, gpio.BothEdges); err != nil {
            log.Fatal(err)
        }

        return
    }

    if err := p.Out(gpio.High); err != nil {
        log.Fatal(err)
    }
}
Internally the Scan function uses the WaitForEdge feature of the pin, whenever the pin changes state, i.e., low to high. We record the durations between these changes and this allows us to parse against the known protocols and transform it to a string representing the switch message.
My Go library which works with Periph.io can be found here:
https://github.com/nicholasjackson/rcswitch
This library has been ported from a C++ library written by Suat Özgür:
https://github.com/sui77/rc-switch
Detecting codes
Run the example application on your Pi setting the correct pin and scan mode, and we can press some buttons on our remote and capture the codes.
pi@pi04:~ $ ./rcswitch_arm6 -pin 4 -scan true
2017/12/24 13:14:20 GPIO4: In/Low
2017/12/24 13:14:20 Starting code detection, press a button on your remote control
Now press the off button on your remote which corresponds to the power plug you would like to control, hopefully, if your sockets are supported by the library you should see the application output something like the following.
2017/12/24 13:14:23 decimal: 16404 // off
2017/12/24 13:14:23 binary: 000000000100000000010100
2017/12/24 13:14:23 bitlength: 24
2017/12/24 13:14:23 protocol: 0
2017/12/24 13:14:23
2017/12/24 13:14:25 decimal: 16405 // on
2017/12/24 13:14:25 binary: 000000000100000000010101
2017/12/24 13:14:25 bitlength: 24
2017/12/24 13:14:25 protocol: 0
2017/12/24 13:14:25
We will need to record the code and the protocol that is output so copy this down for use later on. We can now do the same for the on button, again record this code; the protocol should be the same.
Setting up SQS
Now we have the codes we can go ahead and create an SQS queue for the application in AWS. Go to the AWS console and click on the SQS section.
Click create new queue and fill in the Queue Name
Choose Standard Queue
Click configure queue and change the message retention period to 1 minute.
Click create queue
Click Permissions and add two actions
- SQS:ReceiveMessage
- SQS:SendMessage
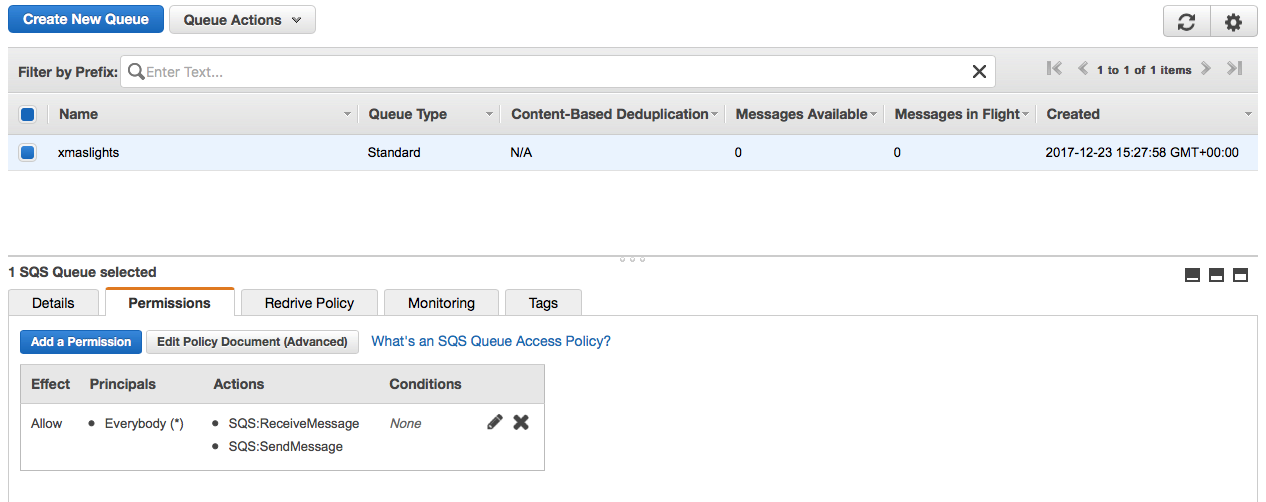
Copy the address for the SQS queue from the details tab; we are going to need this for the application which will listen to messages on the queue.
Running the receiver application on the Pi
We can now run our application on the Pi which will receive these codes and use the rcswitch library to transmit the codes.
You can find the source code for the application, including compiled binaries if you do not wish to build it yourself:
https://github.com/nicholasjackson/xmas-lights-v2
Disconnect the receiver from your Pi and connect the transmitter, again the VCC connects to the power on pin 2, GND to pin 3, and the DATA to pin 4.
main.go
    // Setup the GPIO settings for the 433MHz transmitter
    p := gpioreg.ByName(*pin)
    if p == nil {
        log.Fatal("Unable to find pin: ", *pin)
    }

    p.Out(gpio.High)
    log.Printf("%s: %s\n", p, p.Function())

    sw := rcswitch.New(p)

    c := lights.Config{
        OnCode:   *onCode,
        OffCode:  *offCode,
        Protocol: *protocol,
        SqsURI:   *sqsURI,
    }

    // Create a new SQS Vice transport
    t := sqs.New()

    // Create a new instances of the lights application and setup the transport
    l := lights.New(c, t, sw)
    l.Setup()

    fmt.Println("Listening for messages")
    l.Listen()
We again grab a reference to our GPIO pin using the Periph.io library and configure the package with our codes which we captured earlier, the protocol, and the address for the SQS queue.
Internally we are using the excellent Vice library created by Mat Ryer:
https://github.com/matryer/vice
Vice provides a common abstraction for many different queues such as SQS, and NATS.io streaming and provides us with a Go channel which we can listen to for messages.
lights/lights.go
func (l *Lights) Listen() {
    for m := range l.messageChan {
        message := decodeMessage(m)
        switch message.Command {
        case CommandTurnOn:
            l.swtch.Send(l.config.OnCode, l.config.Protocol)
        case CommandTurnOff:
            l.swtch.Send(l.config.OffCode, l.config.Protocol)
        }
    }
}
For Vice to be able to connect to SQS you will need to set some environment variables corresponding to your AWS account.
export AWS_SECRET_ID=xxxxxxx
export AWS_SECRET=xxxxxxx
export AWS_REGION=[YOUR AWS REGION] // i.e. eu_west_1
We can now run the application using all the information provided earlier and go ahead and create our Alexa skill.
./lights -pin 4 -on_code 0000001101010 -off_code 00000110100 -protocol 0 -sqs_uri http://something.com
Setting up the Alexa skill
Open the Alexa development console and click the Get Started button below Alexa Skills Kit https://developer.amazon.com/edw/home.html#/
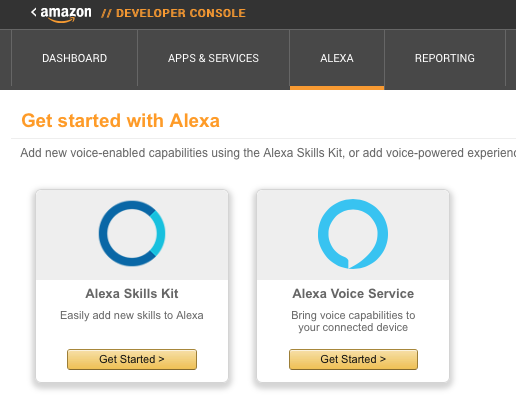
Click Add New Skill.
Give your skill a name and an invocation name.
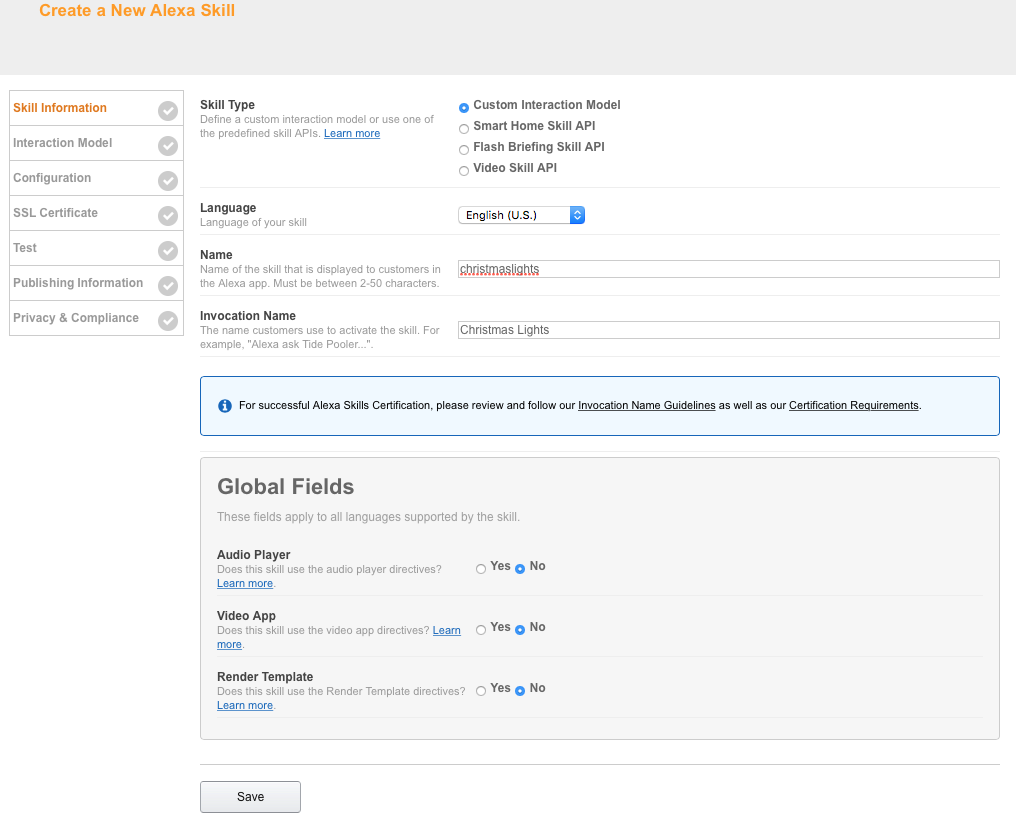
Click Save, then press Next.
We now need to configure the details for our Skill; this includes the things that the skill will respond to (Intents) and variables which will be extracted from the command and sent to the Lambda function (Slots).
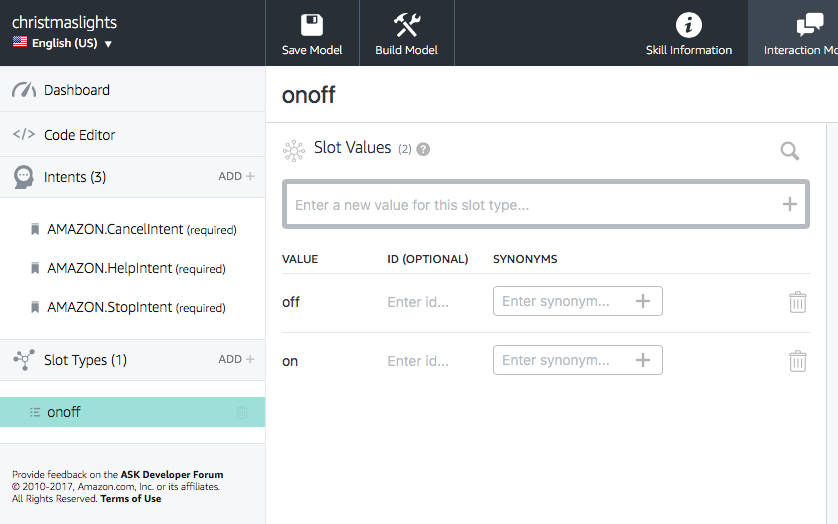
First, click the menu on the left and add a new Slot Type.
Give it a name of onoff
Next step is to configure the values for the slot, and unsurprisingly these will be on and off, add these values using the UI.
Now add an intent by clicking the ADD button on the left-hand menu, give the Intent a name of SwitchLights. If you change the name of the Intent or the Slots, you will need to change the Lambda and the application code.
We are going to add two sample utterances:
- “turn {onoff}”
- “switch {onoff}”
The curly brackets tell the skill that we would like to detect values defined in our onoff slot created in the previous step. When you issue a command to Alexa these values will be extracted and sent with the request to the Lambda function.
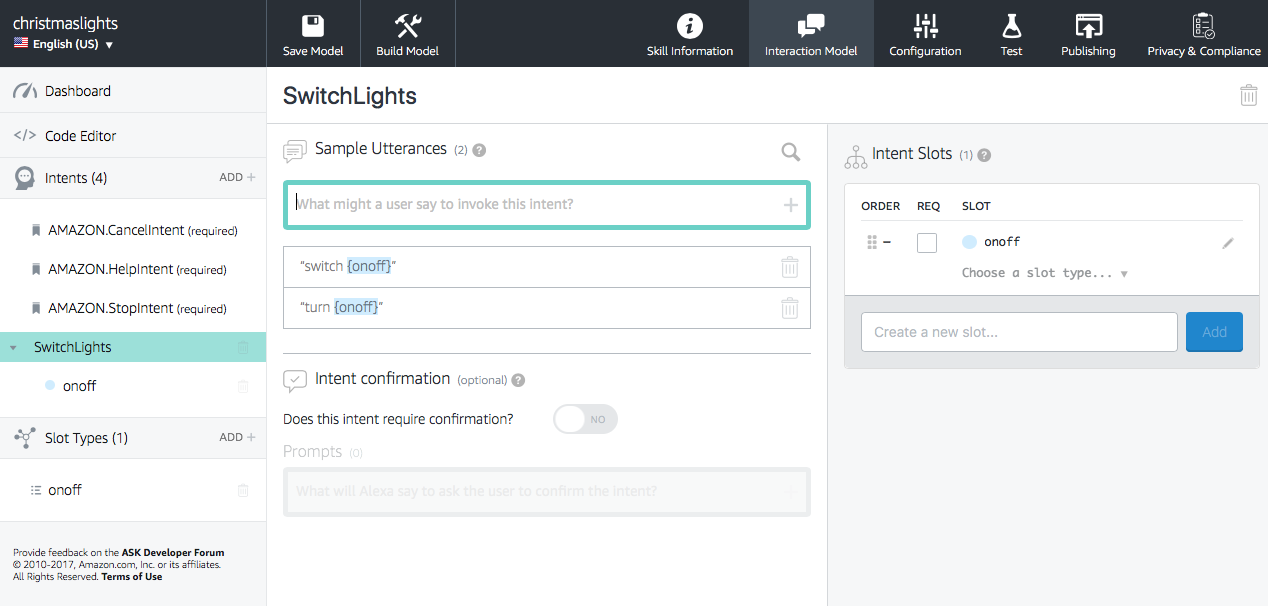
Before saving make sure that you select the Slot Type by clicking on the slot on the right-hand side and then selecting the Slot Type from the new dialog box.
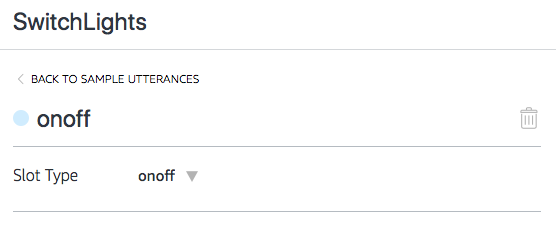
Your intent should now look like the following example:
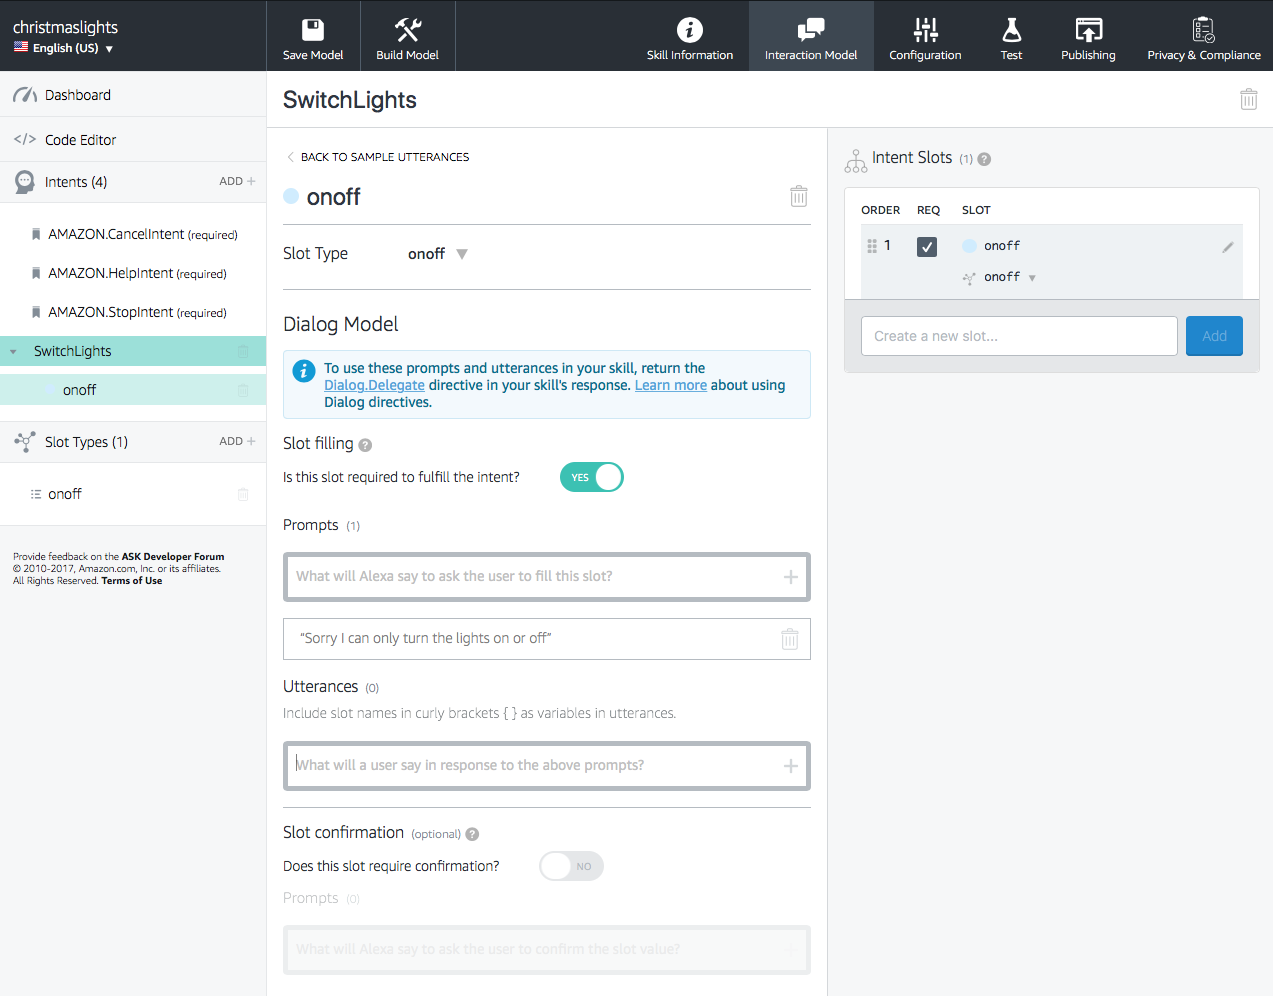
Now we can Save and Build our model.
Creating our Lambda
The next step is to create a Lambda function which will be called by the Alexa skills kit. This function is going to be written in Node.js.
Go to the AWS Lambda section of the AWS consul and select create new lambda, we are going to create a lambda using one of the blueprints as we will need the Alexa SDK node module. Click create lambda from blueprint and choose alexa-skill-kit-sdk-factskill.
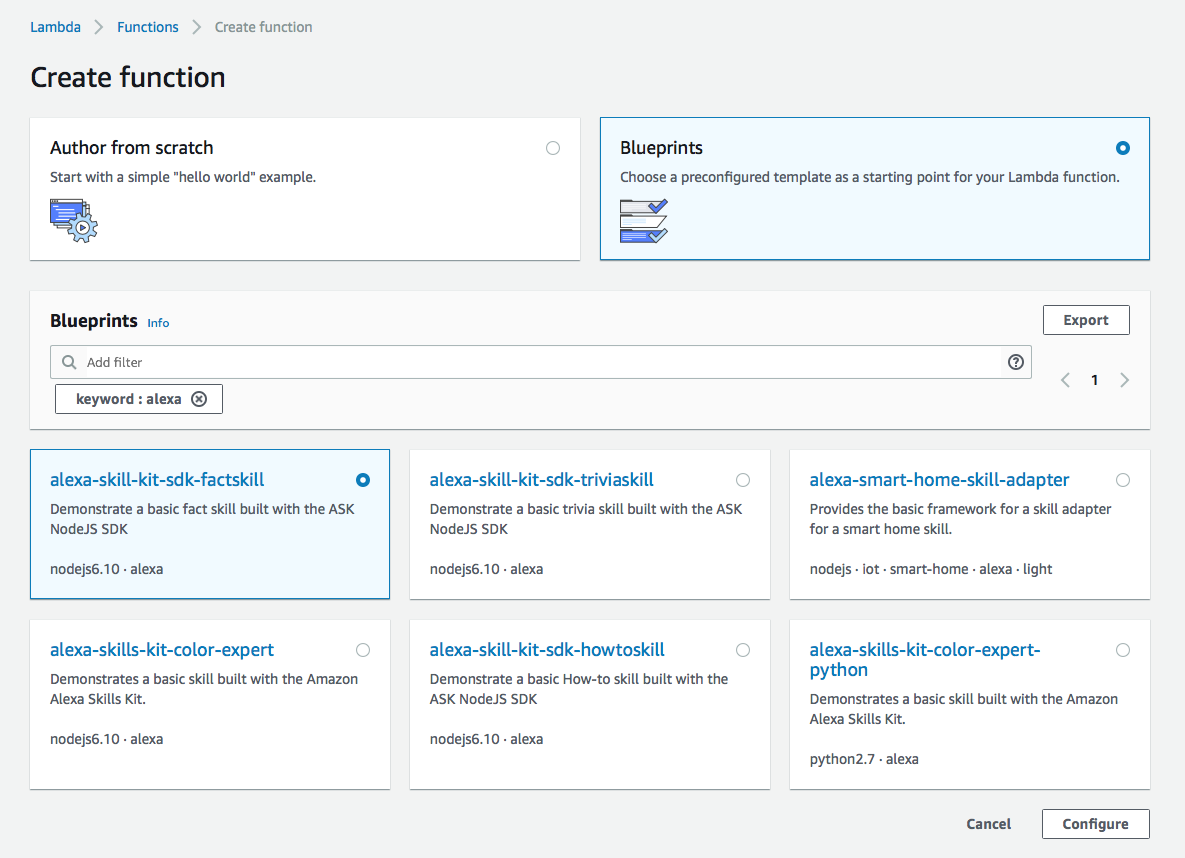
Click Configure and on the next screen give your function a name.
Next we need to create a Role for the function which has permissions to write to logs and also write messages to the SQS queue.
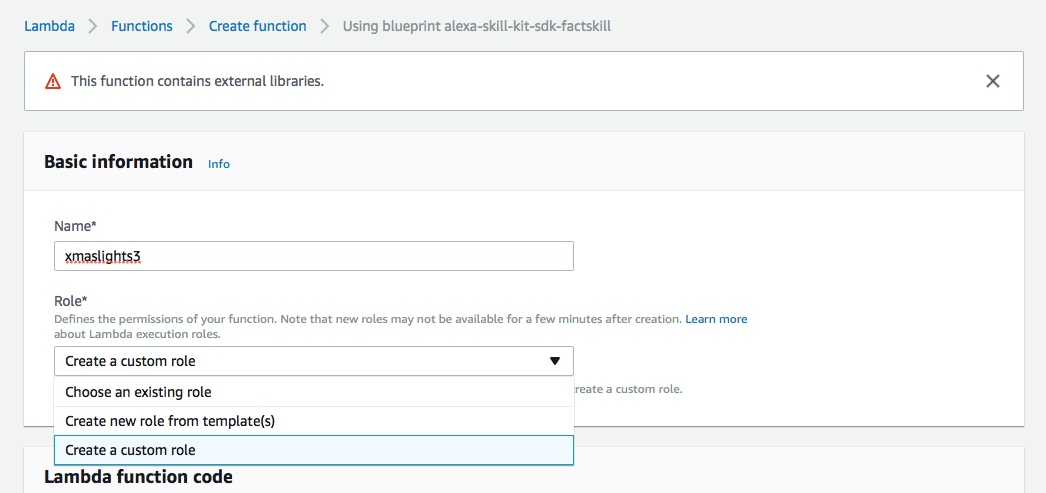
Choose Create a custom role, and the dialog will change to allow you to configure the role.
The default options will be fine however we do need to add the queue permissions, click the edit button and when asked if you have read the documentation nonchalantly click “OK” because nobody reads the documentation.

We need to modify the policy; you should be able to replace the contents of the box with the details listed below. You will need to replace [YOUR ARN HERE] with the ARN of the queue that you created earlier.
IAM Policy
{
    "Version": "2012-10-17",
    "Statement": [
        {
            "Effect": "Allow",
            "Action": [
                "logs:CreateLogGroup",
                "logs:CreateLogStream",
                "logs:PutLogEvents"
            ],
            "Resource": "arn:aws:logs:*:*:*"
        },
        {
            "Action": [
                "sqs:SendMessage"
            ],
            "Effect": "Allow",
            "Resource": "[YOUR ARN HERE]"
        }
    ]
}
When you return to the Lambda console, make sure the role you have just created is selected in the Existing role drop down box and click create function.
Now go down to the code editor and delete all of the code which is in there.
We are going to replace all of the code with our function which is listed below:
handler.js
const Alexa = require('alexa-sdk');
var QUEUE_URL = 'https://sqs.eu-west-1.amazonaws.com/xxxxxxxx/xmaslights';

var AWS = require('aws-sdk');
var sqs = new AWS.SQS({region : 'eu-west-1'});

const handlers = {
  'SwitchLights' : function() {
    //this.emit(':tell','Ok, Merry Christmas')

    console.log(this.event.request.intent);
    var value = this.event.request.intent.slots.onoff.value;
    if (value != "on" || value != "off") {
      this.emit(':tell:', 'Sorry I can only turn the lights on and off');
    }

    var params = {
      MessageBody: JSON.stringify({command: value}),
      QueueUrl: QUEUE_URL
    };

    const self = this
    sqs.sendMessage(params, function(err,data){
      if(err) {
        self.emit(':tell', 'Sorry, something went wrong, maybe you are not a dope coder after all');
      }else{
        self.emit(':tell', 'Ok, Merry Christmas');
      }
    });

  },
  'Unhandled': function() {
    this.emit(':ask', 'Sorry, I dont know how to do that');
  }
};

exports.handler = function(event, context) {
  const alexa = Alexa.handler(event, context);
  alexa.appId = "amzn1.ask.skill.xxxxxx-xxxx-xxxx-xxxx-xxxxxxxxxx"
  alexa.registerHandlers(handlers);
  alexa.execute();
}
You will need to replace the placeholder QUEUE_URL with the address of your SQS queue that you created earlier. You also need to change alexa.appId value and set that to your app id. You can find the app id in the grey bar at the top of the developer console.
Save your function.
We can now go ahead and test our function, all of the parts should be in place to send a test request which will send a message which will be picked up by our Raspberry Pi.
Click test and configure a new test message which corresponds to the listing below:
{
  "session": {
    "new": true,
    "sessionId": "SessionId.04916bd6-7f39-49fb-8860-d8b0ae4b7465",
    "application": {
      "applicationId": "amzn1.ask.skill.fb690610-84f3-4e8f-b38c-d13f727195a9"
    },
    "attributes": {},
    "user": {
      "userId": "amzn1.ask.account.AFQHEN5Q3F5JEM6ZB2SGUQ6IQTRVKV75SNENKTWYRBA2OD4QL427QLHEEST7GI2GQ42WDLJUEAYTNXXXXX4K27YZCAMYTJCIQGZV2ZRIHFWZ7BMRTI7XXXXXXFN2F7LKCM2ED6NZDGL6MYVWOQJVTUEMYIRHKHVGFXKOV3XVMILXZVN2WJARPLKCQPFXQ6QGQ57RIHY"
    }
  },
  "request": {
    "type": "IntentRequest",
    "requestId": "EdwRequestId.cfdaab4a-af02-4d76-be6a-e235c4323072",
    "intent": {
      "name": "SwitchLights",
      "slots": {
        "onoff": {
          "name": "onoff",
          "value": "on"
        }
      }
    },
    "locale": "en-GB",
    "timestamp": "2017-12-23T16:18:21Z"
  },
  "context": {
    "AudioPlayer": {
      "playerActivity": "IDLE"
    },
    "System": {
      "application": {
        "applicationId": "amzn1.ask.skill.fb690610-84f3-4e8f-b38c-d13f727195a9"
      },
      "user": {
        "userId": "amzn1.ask.account.AFQHEN5Q3F5JEM6ZB2SXXXXXXRVKV75SNENKTWYRBA2OD4QL427QLHEESTXXXXXX2WDLJUEAYTN7W5VGTXPSZ4K27YZCAMYTJCIQGZV2ZRIHFWZ7BMRTI7DGUA5P5N7FN2F7LKCXXXXXGL6MYVWOQJVTUEMYIRHKHVGFXKOV3XVMILXXXXRPLKCQPFXQ6QGQ57RIHY"
      },
      "device": {
        "supportedInterfaces": {}
      }
    }
  },
  "version": "1.0"
}
All being well when you press test, your switch should have turned on, if you look at the output in the log from the application running on the Raspberry Pi you should see that it has received a message and has transmitted our code.

2017/12/24 15:09:26 Starting lights: v0.1
2017/12/24 15:09:26 GPIO4: Out/High
2017/12/24 15:09:26 Listening for messages
2017/12/24 15:10:12 Received Message: [123 34 99 111 109 109 97 110 100 34 58 34 111 110 34 125]
2017/12/24 15:10:12 Sending turn on with code: 000000000100000000010101
2017/12/24 15:10:12 Transmitting: 000000000100000000010101
Select Publish a new Version from the Actions menu; then we need to add a trigger.
Back at the top in the designer section, we need to add a trigger for Alexa, select the Alexa Skills trigger from the menu on the left and then configure the options which allows Alexa to call your function.
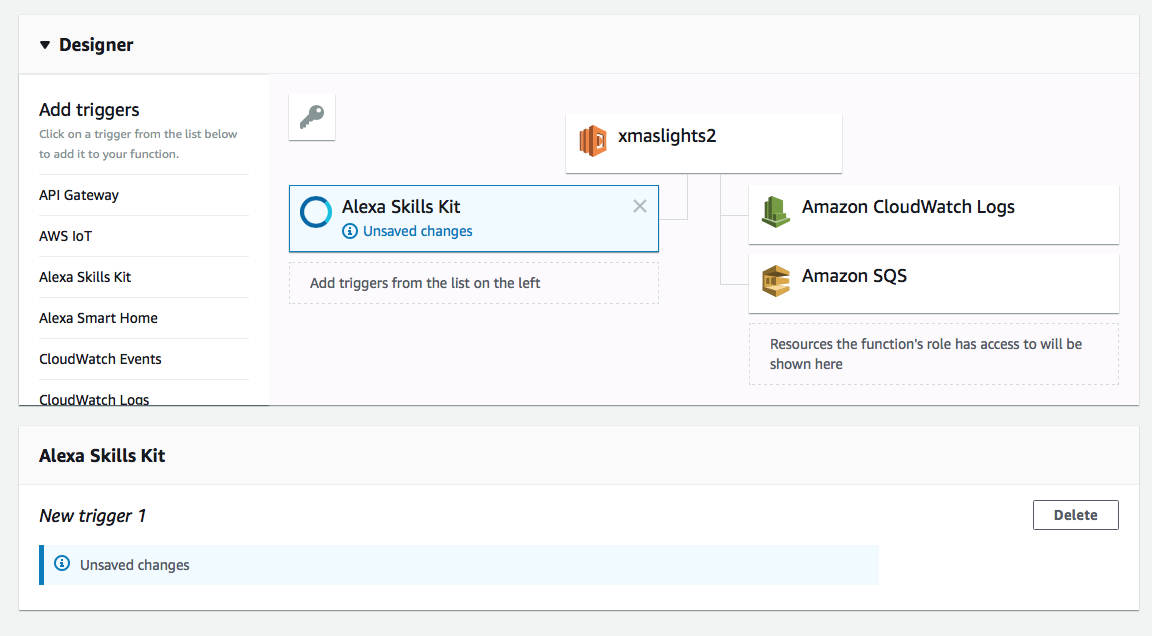
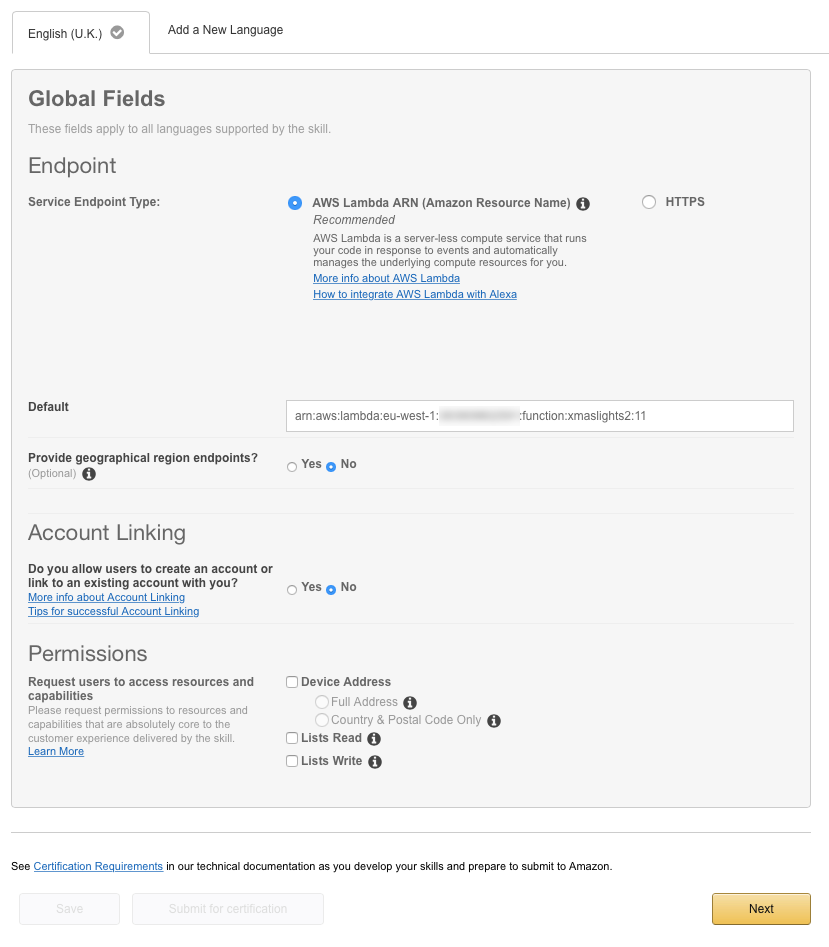
Finally, copy the ARN for the lambda which will look something like this: arn:aws:lambda:eu-west-1:38390000802431:function:xmaslights2:11 and go back to the Alexa skills developer portal.
Configuring Alexa with Lambda
If you click on the configuration menu option, you can paste your Lambda’s ARN into the box.
Click the next button, and we should be able to test our setup. In the test box type an example command like the following:
"Ask Christmas lights to switch on."
You should see a successful response in the output window, and the remote switch should enable. To switch the lights off, we can use a corresponding command”:
"Ask Christmas lights to switch off."
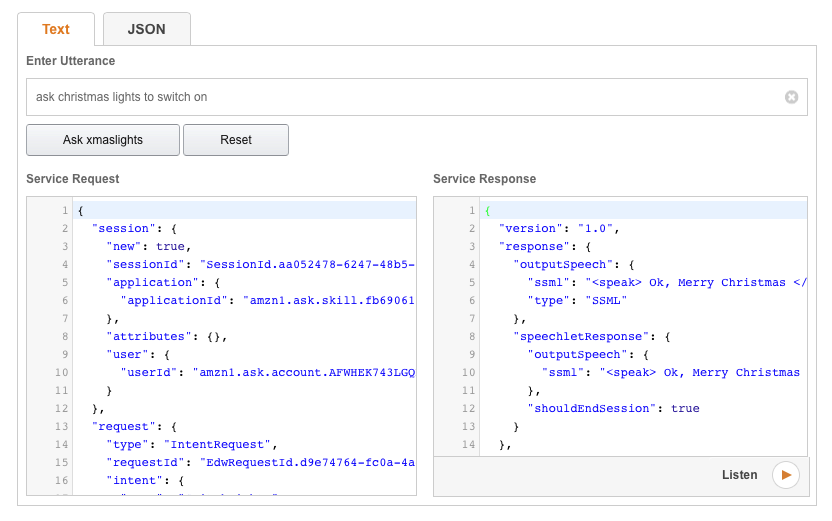
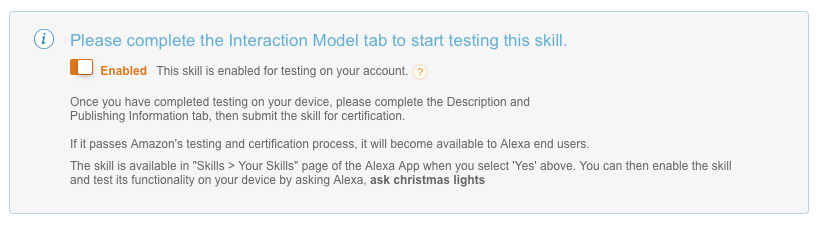
Assuming all of this is now working the last step is to check the box which enables testing of your function, and we can add the skill to our account and try it with our Echo.
If this box is not available, make sure you have linked your Echo device with your Developer account. https://developer.amazon.com/docs/custom-skills/test-a-custom-skill.html#h2_register
All together now
The last thing we need to do is to give it a test; you should now be able to say to Alexa.
"Alexa, ask Christmas lights to switch on."
And the result, instance festive cheer.
Summary
This walkthrough has shown you how you can create a simple Alexa skill and how you can link this to an IOT device such as the Raspberry Pi. Now when dragging your self off to bed after far too much Christmas turkey, you no longer need to find the remote buried under piles of wrapping paper just command your faithful robot:
"Alexa, ask Christmas lights to turn off."
Happy holidays
Resources
Source Code
https://github.com/nicholasjackson/xmas-lights-v2
RCSwitch Go Libary for Periph.io
https://github.com/nicholasjackson/rcswitch
433MHz Switch Protocol Info
https://github.com/sui77/rc-switch/wiki/KnowHow_LineCoding