Building a Slackbot with AWS Lambda and Lex
This post is intended to walk you through creating a Slackbot with AWS Lambda and Lex. I am not using any of the Lambda frameworks like Serverless or Apex in this post instead demonstrates how it is possible to create a Lambda function with pure Node and deploy using HashiCorps Terraform. The simple application is a bot which listens for messages that correspond to the phrase “Which timezone is [user] in?” it then calls the Slack API and retrieve the timezone for that particular user. Lex has the capability of defining an Intent which is a request; the natural language processing means that we do not need to cater for every permutation of the question such as:
- Which timezone is nic in?
- What timezone is nic in?
- Hey @otheruser what timezone is nic in? The Lex runtime selects the best intent based on its natural language processing. In addition to this, we can define variables or Slots which Lex extracts out of the intent and pass to the function.
You can find the source code for this post at https://github.com/nicholasjackson/slack-bot-lex-lambda:
Step 1: Creating the Lambda function
To add interactivity to Lex we can pass an intent to a Lambda function, in our example, this function is going to call the slack API and fetch the Timezone that matches the given user.
file://src/index.js
If we take a look at src/index.js in the code repository, we see that it is a relatively simple Javascript lambda handler.
01 /*jslint node: true */
02 /*jslint esversion: 6 */
03 'use strict';
04
05 process.env.PATH = process.env.PATH + ':' + process.env.LAMBDA_TASK_ROOT;
06
07 var slackClient = require('slack');
08 var dispatcher = require('dispatcher');
09
10 // --------------- Main handler -----------------------
11
12 function loggingCallback(response, originalCallback) {
13    originalCallback(null, response);
14 }
15
16 // Route the incoming request based on intent.
17 // The JSON body of the request is provided in the event slot.
18 exports.handler = (event, context, callback) => {
19    try {
20        // By default, treat the user request as coming from the America/New_York time zone.
21        process.env.TZ = 'America/New_York';
22        console.log(`event.bot.name=${event.bot.name}`);
23
24        dispatcher.dispatch(event, slackClient, (response) => loggingCallback(response, callback));
25    } catch (err) {
26        callback(err);
27    }
28 };
The first thing to note is line 5 because we are going to be bundling a couple of node modules with our Lambda function we need to configure the environment path to be able to pick these up. The path only needs to be set once and not on every file. We are also importing a couple of local modules slack which is our slack client and dispatcher which encapsulates the logic for processing the Lex request. These have been separated out into modules to allow individual unit testing.
line 24 is where we are calling the dispatcher to process the request, we pass to this the reference to the slack client, again separating dependency and increasing testability.
file://src/dispatcher.js
Looking at the file src/dispatcher.js we export a single function which is the one we are calling from our main handler.
 84 /**
 85 * Called when the user specifies an intent for this skill.
 86 */
 87 exports.dispatch = function(intentRequest, slackClient, callback) {
 88  console.log(`dispatch userId=${intentRequest.userId}, intent=${intentRequest.currentIntent.name}`);
 89
 90  const name = intentRequest.currentIntent.name;
 91
 92  if(name == 'WhatTimezone') {
 93     const user = intentRequest.currentIntent.slots.User;
 94
 95     slackClient.getUserDetails(user, (ret) => {
 96      var message = { contentType: 'PlainText', content: '' };
 97      var outcome = 'Failed';
 98
 99      if (ret.err === undefined) {
100        outcome = 'Fulfilled';
101        if (ret.timezone !== undefined) {
102          message.content = user + ' is in ' + ret.timezone;
103        }else {
104          message.content = 'Sorry I can\'t find user: ' + user;
105        }
106      }else {
107        console.log("error: " + ret.err);
108      }
109
110      callback(close(
111        null,
112        outcome,
113        message,
114        null));
115    });
116
117    return;
118  }

  throw new Error(`Intent with name ${name} not supported`);
};
The request that is sent to the function from Lex looks something like this:
{
  "currentIntent": {
    "slots": {
      "User": "nicjackson"
    },
    "name": "WhereIs",
    "confirmationStatus": "None"
  },
  "bot": {
    "alias": "$LATEST",
    "version": "$LATEST",
    "name": "SlackBot"
  },
  "userId": "John",
  "invocationSource": "DialogCodeHook",
  "outputDialogMode": "Text",
  "messageVersion": "1.0",
  "sessionAttributes": {}
}
As we mentioned in the first section, Lex has the capability to extract information from the request and to include it in slots passed as an object to your function. The first thing we are doing in our function is to determine if this Lambda function can handle the intent. On line 92 we are checking this; it is not necessary to perform this check however it could save some headaches if you accidentally wire the wrong function to an Intent. We then call the slack client on line 95 and pass a callback which crafts the response to send back to Lex. The main part of this code to note is line 110, in this instance, we are sending back a Close response to Lex, this sends the message that the response is final and no further interaction takes place for this session. Other valid values are ElicitSlot and ConfirmIntent, the example code has helper functions which can craft the correct responses however for the purpose of simplicity we are only using the close function in this walkthrough.
33 function close(sessionAttributes, fulfillmentState, message, responseCard) {
34    return {
35        sessionAttributes,
36        dialogAction: {
37            type: 'Close',
38            fulfillmentState,
39            message,
40            responseCard,
41        },
42    };
43 }
sessionAttributes are what Lex uses to pass between client and code as it does not log and store these values. A responseCard if used is passed back to slack and can be used in addition to the message to request further information in the form of lists to prompt the user for action. For example, in our application, if we do not find the user mentioned we could send back a list of possible matches, and the user could then click on this item rather than having to type the response. fulfillmentState is a string variable which contains the options of “Fulfilled” or “Failed”. Moreover, the message is an object with the syntax:
{
  contentType: 'PlainText',
  content:     'Some content'
}
file://src/dispatcher.test.js
As an investigation into the workflow for building lambda functions with JavaScript, I have configured a couple of tests for the dispatcher which is the most complicated part of the function.
16 describe('dispatch', () => {
17
18  test('calls the slack API with unknown user', done => {
19    var mockSlack = {
20      getUserDetails: function(user, callback) {
21        callback({ });
22      }
23    };
24
25    dispatcher.dispatch(intentStub, mockSlack,(outcome) => {
26 expect(outcome.dialogAction.fulfillmentState).toEqual('Fulfilled');
27      expect(outcome.dialogAction.message).toBeDefined();
28  expect(outcome.dialogAction.message.content).toEqual('Sorry I can\'t find user: nicjackson');
29      done();
30    });
31
32  });
Using dependency injection on our dispatcher, we can isolate the slack client giving us the capability to unit test the dispatcher. Jest provides some nice matchers for the assertions and if needed also has a comprehensive mocking framework. These tests are by no mean comprehensive or fully covering but they do indicate that it is possible to write Lambda TDD style, and with good test coverage can make up for the inability to easily run locally. The serverless framework does provide the capability to run in dev mode, but my opinion is that by removing this crutch you are pushed to producing a high-quality test suite which carries far greater benefit with long term maintenance.
file://src/slack.js
Our slack client is fairly straight forward and makes a call to the users.list endpoint on the slack API, iterates over the list and selects the timezone for the matching user. At the time of writing, there was no way to directly retrieve a slack user using the API with only having the name of the user, not the ID.
01 /*jslint node: true */
02 /*jslint esversion: 6 */
03 'use strict';
04
05 var slackClient = require('@slack/client').WebClient;
06 var token = process.env.SLACK_API_KEY || '';
07
08 var sc = {
09 };
10
11 exports.getUserDetails = function(username, callback) {
12  var web = new slackClient(token);
13  web.users.list({}, function(err, info) {
14     if (!err) {
15       var timezone = { };
16
17      info.members.forEach((user) => {
18         if (username === user.name) {
19           timezone = { timezone: user.tz_label };
20         }
21       });
22
23       callback(timezone);
24     } else {
25       callback({ error: err });
26     }
27  });
28 };
The main thing to note in this function is that we need the slack API token which is set in the Lambda setup when we deploy the function.
Step 2: Deploying the Lambda function
To deploy the lambda function uses Terraform by HashiCorp, the config for the deployment is found in the terraform folder. For this, to work, we need valid AWS credentials and the Slack API token set to an environment variables on your machine. I recommend using direnv and a .encrc file to manage this rather than setting the variables globally. The variables which we need to set are:
- AWS_ACCESS_KEY - Your aws access key for the account
- AWS_SECRET_ACCESS_KEY - The secret which corresponds to your access key
- TF_VAR_SLACK_API_KEY - A valid API token which can read the users details in slack
file://terraform/lambda.tf
If we take a look at the terraform/lambda.tf we will see that we are defining a IAM role and policy for lambda which allows Lambda to write to the CloudWatch logs. We are also creating an aws_lambda_function resource.
resource "aws_lambda_function" "default" {
  s3_bucket        = "${aws_s3_bucket.default.id}"
  runtime          = "nodejs4.3"
  function_name    = "${var.lambda_function_name}"
  role             = "${aws_iam_role.iam_for_lambda.arn}"
  handler          = "index.handler"
  s3_key           = "${aws_s3_bucket_object.default.id}"
  source_code_hash = "${data.archive_file.lambdazip.output_md5}"

  environment = {
    variables = {
      SLACK_API_KEY = "${var.slack_api_key}"
    }
  }
}
s3_bucket is the s3 bucket where our application code is stored, and the value of this is a reference to another bit of Terraform config.
runtime is specifying that we would like to use the nodejs4.3 runtime for lambda.
function_name this is the name we would like to call our lambda function which is set in the file terraform/terraform.tfvars also, has a value of slackbot.
role this is the IAM role that we created earlier in the config.
s3_key this is the id of the zip file that we have uploaded to s3 which contains our source code.
source_code_hash this is the hash code of our uploaded zip file, should we change the contents of the source code then this hash will be different and triggers a deployment of a new version.
environment for our application to function we need a slack API key, and for simplicity, we are adding this to the environment variables. It is important to note that it is possible to encrypt this using KMS however we are storing this plain text.
file://terraform/s3.tf
This file contains the terraform config to create an s3 bucket where our source code lives and also creates the archive and ensures that upon deploying, the archive is added to the bucket.
data "archive_file" "lambdazip" {
  type        = "zip"
  source_dir  = "${path.module}/../_build"
  output_path = "${path.module}/../lambda.zip"
}

resource "aws_s3_bucket" "default" {
  bucket = "${var.s3_bucket_name}"
  acl    = "private"

  tags {
    Name        = "${var.s3_bucket_name}"
    Environment = "Development"
  }
}

resource "aws_s3_bucket_object" "default" {
  bucket = "${aws_s3_bucket.default.bucket}"
  key    = "slackbot"
  source = "${path.module}/../lambda.zip"
  etag   = "${data.archive_file.lambdazip.output_md5}"
}
We can use a data element archive_file which will create a zip archive for us when terraform runs. We are setting the paths for the source_dir which is the folder created when we run make build, and the output is a file called lambda.zip in our source code root.
Terraform also has the capability to create an s3 bucket for us, if you already have a bucket that you would like to use then you can skip this resource element and directly add the arn to the bucket attribute of the aws_s3_bucket stanza. If already have an S3 bucket you would like to use for your source code remember that it must exist in the us-east-1 zone until Lex is rolled out across the other zones in AWS.
Deploying the function
To deploy the function we can run:
$ make package
$ make deploy
These commands install the yarn dependencies for testing and then run the test, build, and deploy steps, the deploy step simply runs terraform plan && terraform apply . The packaging step only needs to be run once or when you would like to update jest.
package:
  cd src && yarn install
test:
    cd src && yarn run jest

clean:
    rm -rf _build

build: clean
    mkdir _build
    cp src/index.js _build/
    cp src/dispatcher.js _build/
    cp src/slack.js _build/
    npm install --prefix=_build @slack/client

deploy: test build
    cd terraform && terraform plan
    cd terraform && terraform apply
You will see some output on the command line:
cd src && yarn run jest                                                                                                                                                                                                                                                                    yarn run v0.22.0                                                                                                                                                                                                                                                                           $ "/Users/nicj/Developer/lambda/slack-bot/src/node_modules/.bin/jest"                                                                                                                                                                                                                       PASS  ./dispatcher.test.js                                                                                                                                                                                                                                                                  dispatch                                                                                                                                                                                                                                                                                     ✓ calls the slack API with unknown user (4ms)                                                                                                                                                                                                                                              ✓ calls the slack API with known user (1ms)                                                                                                                                                                                                                                                ✓ returns error when error from slack API                                                                                                                                                                                                                                                                                                                                                                                                                                                                                                                                         Test Suites: 1 passed, 1 total                                                                                                                                                                                                                                                             Tests:       3 passed, 3 total                                                                                                                                                                                                                                                             Snapshots:   0 total                                                                                                                                                                                                                                                                       Time:        0.539s, estimated 1s                                                                                                                                                                                                                                                          Ran all test suites.                                                                                                                                                                                                                                                                         console.log dispatcher.js:88                                                                                                                                                                                                                                                                 dispatch userId=undefined, intent=WhereIs                                                                                                                                                                                                                                                                                                                                                                                                                                                                                                                                           console.log dispatcher.js:88
    dispatch userId=undefined, intent=WhereIs

  console.log dispatcher.js:88
    dispatch userId=undefined, intent=WhereIs

  console.log dispatcher.js:107
    error: Something went wrong
                                                                                                                                                                                                                                                                                           ✨  Done in 1.01s.

...

Apply complete! Resources: 0 added, 1 changed, 0 destroyed.

The state of your infrastructure has been saved to the path
below. This state is required to modify and destroy your
infrastructure, so keep it safe. To inspect the complete state
use the `terraform show` command.

State path:
If you take a look at your AWS Lambda dashboard (N.Virginia) you should now see a new function and we can begin to configure Lex and Slack.
Step 3 Configuring AWS Lex and Slack
- Sign in to the AWS Management Console and open the Amazon Lex console at https://console.aws.amazon.com/lex/.
- Click the Create button and choose Custom Bot fill in the details and then press Create.

- Click Create intent and the Create new Intent
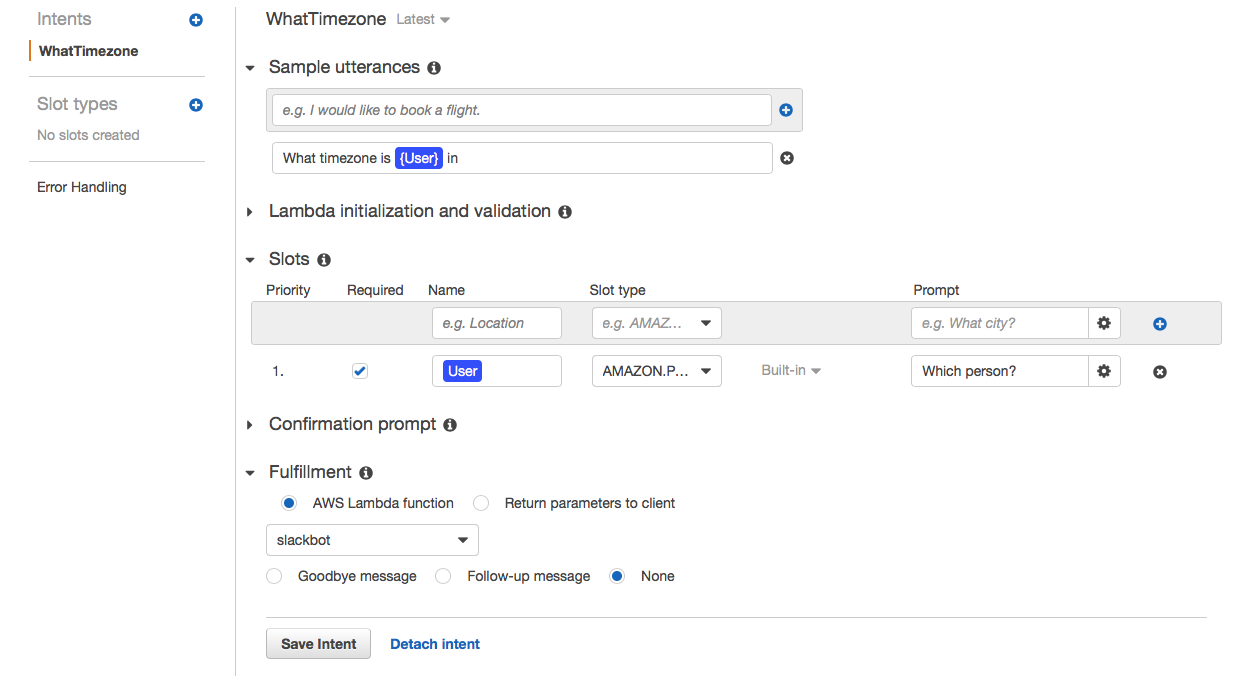
- Enter the title of the intent “WhatTimezone” and press Create
- Add the utterances “What timezone is {User} in” and the slots User which has the type AMAZON.Person. Select our lambda function in the Fulfillment section and then save the intent.
- To test our bot we need to build it so press the Build button in the top right-hand corner, the test window will then pop up and you can test your bot is working before connecting it to slack. If you have called your Intent something different to “WhatTimezone” then you need to update the code in src/dispatcher.js accordingly.
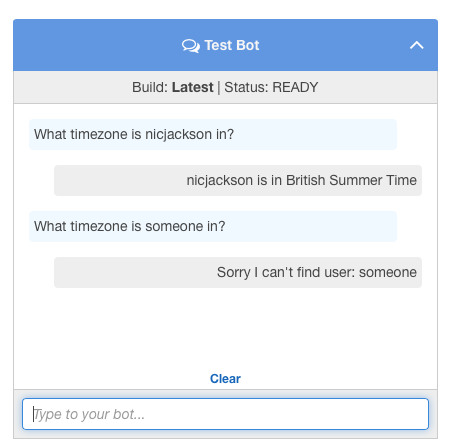
- We can now publish the function by pressing the Publish button in the top right-hand corner and proceed to configure Slack.
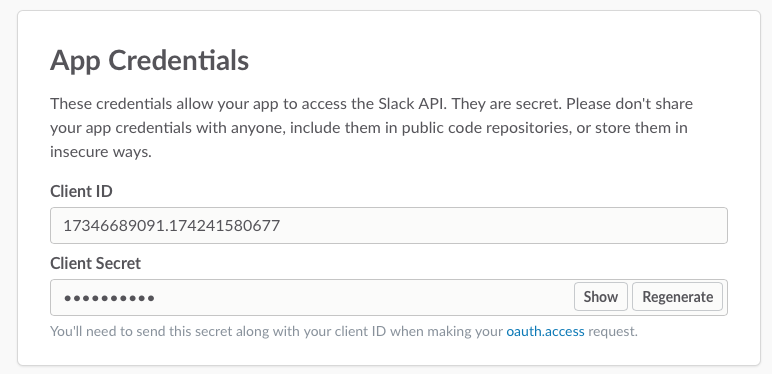
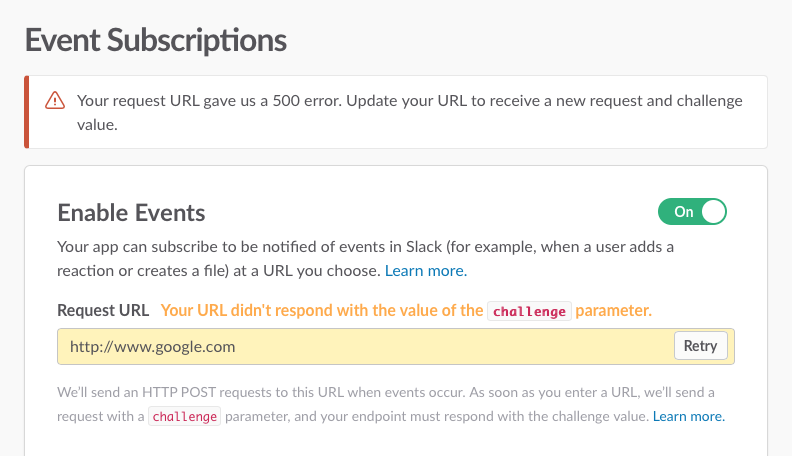
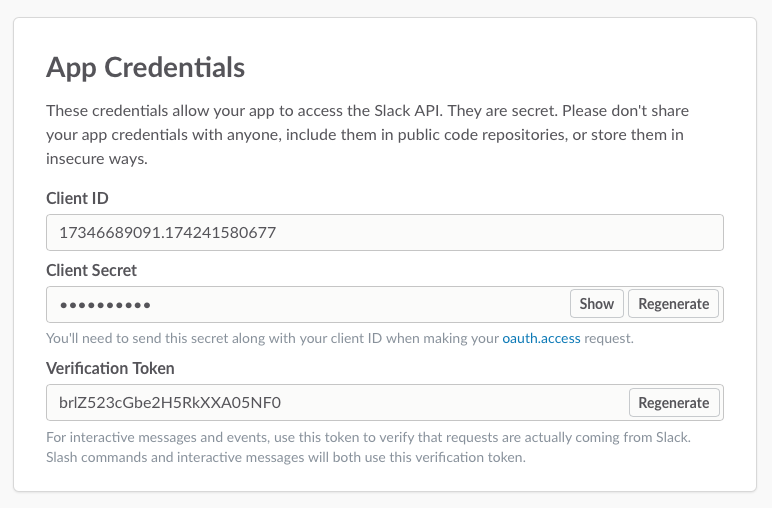
- The default instructions from AWS are just fine for configuring slack, so rather than reproduce them verbatim I encourage you to follow steps 3 through 6 in the following guide. http://docs.aws.amazon.com/lex/latest/dg/slack-bot-association.html. One important thing to note is that when you are setting up your channel you will be asked for a Verification Token, Slack only shows the Verification token on the Basic Information screen once you have added an Event Subscription however until you add the verification token AWS will not give you the URL. To get round this click on Event Subscriptions enter any URL and once you have a verification failed message again click on Basic Information.
Step 4 testing in Slack
Once everything has been configured, you can then go to your slack team invite the slackbot you have just created to the channel and then when you write a message like “What timezone is nicjackson in?”, the bot should reply with the correct answer.

Summary
This example is only a simple based on some investigation I did at the weekend into Lex; however, it has been quite fun, and I will certainly continue to work on this and add more advanced functionality. All the resources and links for this talk are listed below, and if you need any assistance, I can be found on Twitter.
Source Code:
https://github.com/nicholasjackson/slack-bot-lex-lambda
Lex Developer Guide:
http://docs.aws.amazon.com/lex/latest/dg/what-is.html
Lex Input and Response Format:
http://docs.aws.amazon.com/lex/latest/dg/lambda-input-response-format.html
Terraform:
https://www.terraform.io
Jest:
https://facebook.github.io/jest/